Oil Painting Progression, Part 1 – “The Rough-In”
Hello all, I’ve been excited about getting this new series of articles underway. I’ll be highlighting a step-by-step process from beginning to completion of one of my recent animal oil paintings, entitled Larka and Dylan. The lovely and (somewhat) willing participants in this venture consist of a Bernese Mountain Dog and a Pembroke Welsh Corgi, both full of mischief and personality. I couldn’t have asked for a better pair of sitters …so long as I had a camera that is. As much as I enjoyed the painting process, I’ll also cherish the many “outtakes” I brought away from my photo shoot with the pooches.
OK, without further ado we’ll begin with a link to check out the finished painting. Feel free to click here for anyone who likes to peek at a book’s ending before they’ve read all the chapters. Then, please come back and we’ll get started.
The first photo illustration shows the painting surface. Please pardon the uneven lighting from a nearby lightbulb. In many instances, I enjoy working on a firm surface, and this particular board is a piece of archival quality gessoed linen canvas board, which I purchased pre-prepared. Dimensions are 24″ x 18″. Sometimes, artists like to tint their surface with a neutral paint color or a warm brown underpainting, and I’ve done this before. Lately, I’ve been opting for leaving the surface white, as I like the brighter, luminous quality it naturally lends to the layers of paint that get added to it, especially in the case of lighter colors.

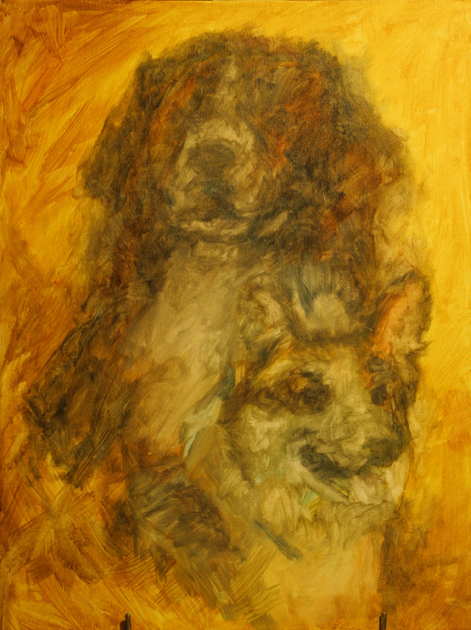
Next, we see the initial “rough in” phase. As mentioned, I’m working from photographic reference, since dogs generally have a hard time sitting still for long periods. In fact, I pre-arranged the composition in Photoshop, using separate photos I’d taken of the two dogs, picking my favorite ones which I felt would look harmonious together as a double portrait.
The medium is water-mixable oil paint which I love because of its workability and cleanup without turpentine. In spite of its being mixable with water when fresh out of the tube, the paint is nonetheless oil paint, and is not water soluble when dry. Recommended curing time is the same as with traditional oil paint – at least six months to a year, after which the painting can be varnished.
The rough-in or “block-in” phase is visibly a rapid process of quick observation, and visual note-taking. I like to cover the whole surface of the board during this process so I can establish the relative positions of as many elements of the painting as possible. This helps avoid future frustration and wasted time having to correct the positions of various elements which have been carefully rendered only to discover they’re in the wrong place! Been there, done that, thanks, but no thanks. What’s shown here is really the first stage in a continuing process of just blocking in shapes of color and value, beginning with a large aggregate “block-in” and gradually refining the “blocking-in” process down to what are commonly referred to as the “details” of the painting. One might argue that the thought process at this initial rough-in phase differs from that of refining the details of an eyeball, only in the size of the brush used, or perhaps the speed of paint application.
Before wrapping up, I should probably note that my emphasis on “speed” is not really to indicate that speed is necessarily a critical element at this or any other phase of a painting (excluding any deadlines of course). The reason I work this initial phase of the painting quickly is simply to avoid the tendency of getting caught up wasting time and effort, focusing on the details prematurely. I also think this rapid sketching phase helps set the stage for a more organic and lifelike finished product. Some of the brush strokes from this initial phase may even survive all the way to the finished piece. Many artists like to draw their image out on the canvas in pencil or charcoal before beginning to paint. In that case, once the composition is established by drawing, one can move more directly into painting the details of each area of the piece. I have no argument with that process. For myself, I’ve generally leaned towards beginning directly with paint, enjoying its looseness, fluidity, and lack of pre-imposed boundaries from start to finish.